

帖子详情
WORDPRESS网站制作首页顶部的轮播切换图的方法,之前论坛中讲过自己建网站如何制作轮播切换图,但制作出来的轮播切换图的尺寸是固定不变的,而且切换的图片内容也是固定设置的,如果要更换图片,就需要通过FTP软件去修改。
制作Wordpress轮播切播图常用的有以下二种方法:
方法一:通过WORDPRESS轮播图插件制作
WORDPRESS有很多有用功能插件,其中就包括一款轮播图插件,通过这个插件就可以轻松制作出轮播图。使用方法见:WordPress轮播图幻灯片插件Slideshow Gallery
方法二:通过代码制作轮播图
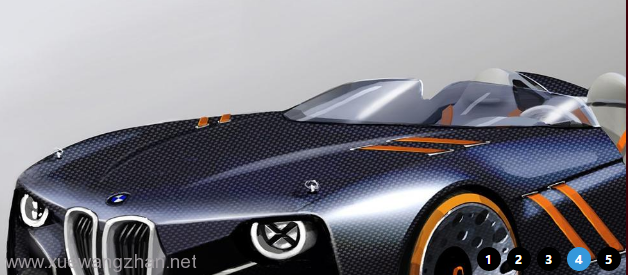
下面介绍一种非插件的方法制作WORDPRESS网站轮播切换图的方法,它最大的好处在于网站管理员可以随意在网站后台去控制要显示的内容。我们先来看看它制作好后的样式吧!
方法/步骤
第一步:将以下代码放入自己网站主题的functions.php中,用于显示缩略图
//缩略图
function get_first_image() {
global $post;
$first_img = ”;
ob_start();
ob_end_clean();
$output = preg_match_all(‘/<img.+src=[\’"]([^\’"]+)[\’"].*>/i’, $post->post_content, $matches);
$first_img = $matches [1] [0]; if(empty($first_img)){ //Defines a default image $first_img = bloginfo(‘template_url’) . "/images/default.jpg";
return $first_img;
}
第二步:在网站上需要显示轮播切换图的位置,放上以下的HTML代码。
<!–图片轮播区–>
<div id="com_box" class="com_box ftl">
<?php
$sticky = get_option(‘sticky_posts’);
rsort( $sticky );//对数组逆向排序,即大ID在前
$sticky = array_slice( $sticky, 0, 5);//输出置顶文章数,请修改5,0不要动,如果需要全部置顶文章输出,可以把这句注释掉
query_posts( array( ‘post__in’ => $sticky, ‘caller_get_posts’ => 1 ) );
if (have_posts()) :while (have_posts()) : the_post();
?>
<div class="img dpn"><a href="<?php the_permalink(); ?>" target="_blank" title="<?php the_title(); ?>"><img class="img_directly_load" src="<?php echo get_first_image(); ?>" alt="<?php the_title(); ?>" /></a></div>
<?php endwhile; endif; ?>
<ul id="com_txt" class="title">
<?php
$sticky = get_option(‘sticky_posts’);
rsort( $sticky );//对数组逆向排序,即大ID在前
$sticky = array_slice( $sticky, 0, 5);//输出置顶文章数,请修改5,0不要动,如果需要全部置顶文章输出,可以把这句注释掉
query_posts( array( ‘post__in’ => $sticky, ‘caller_get_posts’ => 1 ) );
if (have_posts()) :while (have_posts()) : the_post();
?>
<li></li>
<?php endwhile; endif; ?>
</ul>
</div>
<script type="text/javascript">
function com_change()
{
var self_now = 0;
var self_speed = 5000;
var self_auto_change = null;
var self_max = $(‘#com_box div.img’).size();
function self_change(i)
{
$(‘#com_box div.img’).hide();
$(‘#com_txt_bg li’).removeClass(‘on’);
$(‘#com_txt li’).removeClass(‘on’);
$(‘#com_box div.img:eq(‘ + i + ‘)’).show();
$(‘#com_txt_bg li:eq(‘ + i + ‘)’).addClass(‘on’);
$(‘#com_txt li:eq(‘ + i + ‘)’).addClass(‘on’);
}
function self_interval()
{
return setInterval(function(){
self_now++;
if (self_now >= self_max)
{
self_now = 0;
}
self_change(self_now);
}, self_speed);
}
$(‘#com_box div:first’).show();
$(‘#com_txt_bg li:first’).addClass(‘on’);
$(‘#com_txt li:first’).addClass(‘on’);
$(‘#com_txt li’).each(function(i)
{
$(this).mouseover(function(){
self_now = i;
clearInterval(self_auto_change);
self_change(i);
}).mouseout(function(){
self_auto_change = self_interval();
});
});
$(function(){
$(‘#com_loding’).hide();
self_auto_change = self_interval();
});
}
com_change();
</script>
第三步:即然是切换图片,就少不了JS的帮助,下载JS文件: jquery.js
将下载的JS文件放到images文件夹下,在header.php上面放上一个js代码:
<script type="text/javascript" src="<?php bloginfo(‘template_url’); ?>/images/jquery.js"></script>
第四步:下面就是通过CSS来控制图片显示的样式了,复制以下的CSS样式,放到自己网站的CSS文件的特别下方。(width:627px代表轮播切换图幻灯片宽度,可以根据自己需要修改)
/*换灯片*/
.com_box {width:627px;height:279px;overflow:hidden;position:relative;}
.com_box img{width:100%;height:100%;}
.com_box ul.title li.on {background:#3598db;}
.com_box ul.title {position:absolute;bottom:10px;right:5px;z-index:9;}
.com_box ul.title li {counter-increment:listxh;display:inline-block;border-radius:12px;background: #000;}
.com_box ul.title li:before{content:counter(listxh);display:inline-block;text-align:center;color:#fff;width:24px;height:24px;line-height:24px;font-weight:600;font-size:11px;font-family: "微软雅黑";}
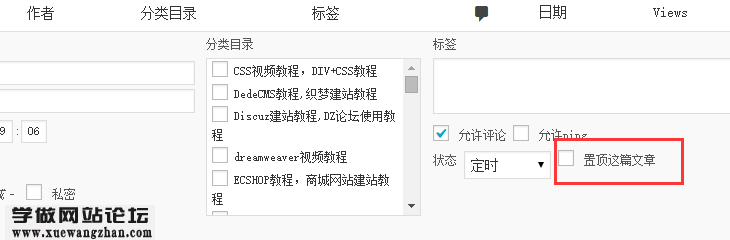
第五步:如何在网站后台去控制切换图片的内容呢?很简单了,只需要在网站后台设置哪些要显示的内容的文章置顶即可,这样这些文章中的图片就会自动的调用到切换图中来了。
版权:言论仅代表个人观点,不代表官方立场。转载请注明出处:https://www.52diyhome.com/forum/65197.html